kubesphere之-安装
kubersphere官网 版本2.1.1
1.前提条件
KubeSphere 支持离线和在线的方式部署至现有的 Kubernetes 集群,部署之前请确保您的 Kubernetes 环境满足以下 4 个前提条件:
Kubernetes版本:1.15.x ≤ K8s version ≤ 1.17.x;Helm版本:2.10.0 ≤ Helm Version < 3.0.0(不支持 helm 2.16.0 #6894),且已安装了 Tiller,参考 如何安装与配置 Helm (预计 3.0 支持 Helm v3);- 集群已有默认的存储类型(StorageClass),若还没有准备存储请参考 安装 OpenEBS 创建 LocalPV 存储类型 用作开发测试环境。
- 集群能够访问外网,若无外网请参考 在 Kubernetes 离线安装 KubeSphere。
2.安装Helm(master节点)
Helm是Kubernetes 的包管理器。包管理器类似于我们在Ubuntu中使用的apt、CentOS中使用的yum或者Python中的pip一样,能快速查找、下载和安装软件包。Helm由客户端组件helm和服务端组件Tiller组成,能够将一组K8S资源打包统一管理,是查找、共享和使用为Kubernetes构建的软件的最佳方式。
-
验证版本
helm version -
安装
curl -L https://git.io/get_helm.sh | bash # 或者 wget http://oss.tianch.xyz/k8s/get_helm.sh -
创建权限
下载helm-rbac.yamlwget http://oss.tianch.xyz/k8s/helm-rbac.yamlkubectl apply -f helm-rbac.yaml -
安装tiller(master上)
-
初始化
helm init --service-account=tiller --tiller-image=sapcc/tiller:v2.16.3 --history-max 300 -
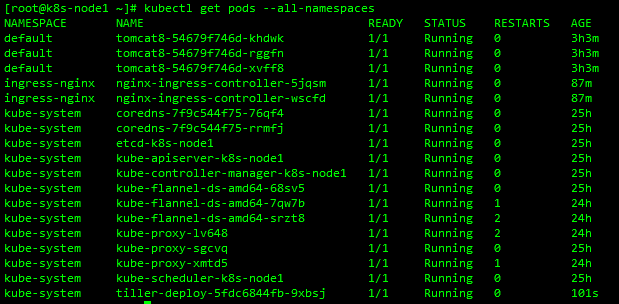
验证是否安装完成
helm
tiller
kubectl get pods --all-namespaces
-
-
安装 OpenEBS 创建 LocalPV 存储类型
- 确认 k8s-node1节点是否有 Taint
kubectl describe node k8s-node1 | grep Taint- 去掉 k8s-node1节点的 Taint
kubectl taint nodes k8s-node1 node-role.kubernetes.io/master:NoSchedule-- 创建 OpenEBS 的 namespace
kubectl create ns openebs- 若集群已安装了 Helm,可通过 Helm 命令来安装 OpenEBS
helm install --namespace openebs --name openebs stable/openebs --version 1.5.0- 通过 kubectl 命令安装
kubectl apply -f https://openebs.github.io/charts/openebs-operator-1.5.0.yaml- 查看创建的 StorageClass
kubectl get sc- 将
openebs-hostpath设置为 默认的 StorageClass
kubectl patch storageclass openebs-hostpath -p '{"metadata": {"annotations":{"storageclass.kubernetes.io/is-default-class":"true"}}}'-
重新给k8s-node1加上 Taint (
安装kubesphere时不要有污点 有的话去掉再装 需要让master也参与调度)kubectl taint nodes k8s-node1 node-role.kubernetes.io/master=:NoSchedule
-
测试 StorageClass
- 创建一个 demo-openebs-hostpath.yaml
apiVersion: apps/v1 kind: Deployment metadata: name: percona labels: name: percona spec: replicas: 1 selector: matchLabels: name: percona template: metadata: labels: name: percona spec: securityContext: fsGroup: 999 tolerations: - key: "ak" value: "av" operator: "Equal" effect: "NoSchedule" containers: - resources: limits: cpu: 0.5 name: percona image: percona args: - "--ignore-db-dir" - "lost+found" env: - name: MYSQL_ROOT_PASSWORD value: k8sDem0 ports: - containerPort: 3306 name: percona volumeMounts: - mountPath: /var/lib/mysql name: demo-vol1 volumes: - name: demo-vol1 persistentVolumeClaim: claimName: demo-vol1-claim --- kind: PersistentVolumeClaim apiVersion: v1 metadata: name: demo-vol1-claim spec: storageClassName: openebs-hostpath accessModes: - ReadWriteOnce resources: requests: storage: 5G --- apiVersion: v1 kind: Service metadata: name: percona-mysql labels: name: percona-mysql spec: ports: - port: 3306 targetPort: 3306 selector: name: percona- 使用 kubectl 命令创建相关资源
kubectl apply -f demo-openebs-hostpath.yaml -n openebs-
如果 PVC 的状态为 Bound 并且 Pod 状态为 running,则说明已经成功挂载,证明了默认的 StorageClass(openebs-hostpath)是正常工作的
kubectl get pvc -n openebs
3.最小化安装kubesphere
kubesphere-minimal.yaml
-
应用
wget http://oss.tianch.xyz/k8s/kubesphere-minimal.yaml kubectl apply -f kubesphere-minimal.yaml -
查看滚动刷新的安装日志
kubectl logs -n kubesphere-system $(kubectl get pod -n kubesphere-system -l app=ks-install -o jsonpath='{.items[0].metadata.name}') -f
-
安装完成后 重新给k8s-node1加上 Taint
kubectl taint nodes k8s-node1 node-role.kubernetes.io/master=:NoSchedule
4.最小化安装后的定制化安装
- 通过修改 ks-installer 的 configmap 可以选装组件 将False改成True wq保存退出就会开始安装了 花费时间有点长
kubectl edit cm -n kubesphere-system ks-installer

